
|
Getting your Trinity Audio player ready...
|
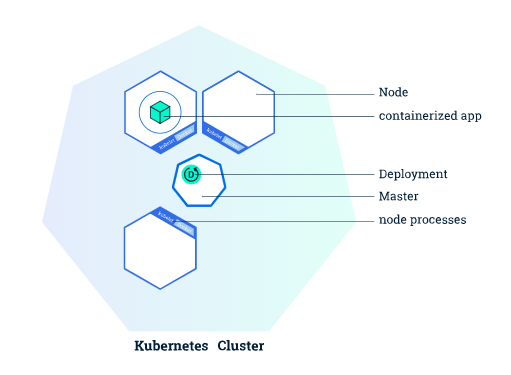
Kubernetes Deployments, in plain words, are responsible for creating, updating and deleting instances (pods) of your application. It also provides a self-healing mechanism that helps you when your application crashes. Well, before that, if you don’t know already, Kubernetes is an open-source container orchestration platform that can run and manage enterprise-class web-scalable applications.

Kubernetes Cluster
Before you begin deployment, make sure your Kubernetes cluster is up and running. To deploy, you can either use a self-hosted cluster like Minikube or you can use a hosted Kubernetes cluster, such as Google Kubernetes Engine. When you install Minikube, you also need to install Kubectl, a command-line client for Kubernetes. Kubectl uses the Kubernetes API to interact with the cluster.
To start Minikube, execute the command minikube start and after it is completed, execute kubectl get nodes and you should get:
kubectl get nodes
NAME       STATUS    ROLES     AGE       VERSION
minikube   Ready     <none>    11m       v1.13.0
Pods
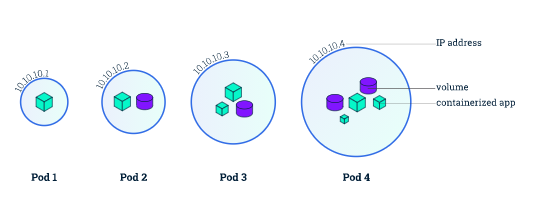
A pod is the smallest logical unit that you can deploy into a Kubernetes cluster. It consists of one or more containers and shared persistent volumes. Every pod runs on an isolated private network and the containers on it can communicate with each other via localhost. Pods are ephemeral. They eventually die when an application is scaled up or down.
You have workload resources that create and manage multiple pods. The examples are Deployments, DaemonSet, StatefulSet, etc. For example, a Deployment Controller will handle replication and rollout and automatic healing in case of a Pod failure.
Each controller for a workload resource uses the PodTemplate inside the workload object to make actual Pods. The PodTemplate is part of the desired state of whatever workload resource you used to run your app. Kubernetes resources are managed using YAML.
my-pod.yaml
apiVersion: v1
kind: Pod
 #Kind of resource
metadata:
  name: my-app
  labels:
    application: my-app
spec:
  containers: # List of containers running in one Pod
    - name: hello-app
      image: gcr.io/google-samples/hello-app
      tag: 1.0
      ports:
      - containerPort: 8080 # Port to expose on the Pod's IP address
      env: # Environment variable
      - name: NODE_ENV
        value: prod
      imagePullPolicy: IfNotPresent # Options: Always, Never, IfNotPresent
The commands in kubectl are of the form:
kubectl <action> <resource> <resource-name> <flags>

where, <action> is Kubernetes action verbs like create, delete, apply
       <resource> is Kubernetes objects like pods, deployments, jobs
Execute the below commands to deploy, update or view pods.
# To deploy a single pod
kubectl create my-pod.yaml

# To update the pod with added resources and create if it doesn't exist
kubectl apply -f my-pod.yaml

# To view the running pods
kubectl get pods
You can see the YAML file configuration, view the details of the pod and many more features using kubetcl commands. The complete cheat sheet for kubectl commands is listed here.
Deployments
To really harness the power of Kubernetes, you need to deploy pods using the Kubernetes Deployment resource. A Deployment runs multiple replicas of your application and automatically replaces any instances that fail or become unresponsive. In this way, Deployments help ensure that one or more instances of your application are available to serve user requests. Deployments are managed by the Kubernetes Deployment controller.
We can always deploy pods using the previous example, but Deployments is the recommended way to deploy pods as it gives you a lot of advantages:
- If one of the Pods terminates, the Deployment controller will create another Pod immediately.
- You need a single YAML file to define your pod template and the number of replicas
- If the Node hosting an instance goes down, the Deployment controller replaces the instance with an instance on another Node in the cluster
- If you want to apply a change to your Pods, the Deployment controller will take care of it by updating the pods gradually, one pod at a time.
my-deployment.yaml
apiVersion: apps/v1
kind: Deployment
metadata:
  name: my-app
spec:
  replicas: 3
 # To create 3 replicas of the pod
  selector:
    matchLabels:
      run: my-app
  template:
 # This is where the pod template is specified
    metadata:
      labels:
        run: my-app
    spec:
      containers:
      - name: hello-app
        image: gcr.io/google-samples/hello-app:1.0
We have similar kubectl commands for deploying the pods using the Deployment resource in the Kubernetes cluster.
# To apply changes in the pods and create pods if it doesn't exist
kubectl apply -f my-deployment.yaml
When the above kubectl command is executed, Kubernetes will create a Deployment resource which, in turn, creates a ReplicaSet. A ReplicaSet is simply there to manage identical copies of a pod and to make sure they’re running and healthy.
If you want to update the deployment where you want to increase the replicas from three to six, and you also want to change the image version from 1.0 to 2.0. After making the change in the YAML file, you need to apply the changes again using the kubectl apply command.
When the command is executed, Kubernetes will recognize the change to that deployment and will create a new ReplicaSet with that new image and the number of replicas. Kubernetes will do a rolling update to make sure that no downtime is happening while those pods are being updated to the new version of that image.
Similarly, you have the kubectl command to delete the deployment, which will also delete the pods defined by it.
# To delete the deployment resource
kubectl delete -f my-deployment.yaml
The other kubectl commands for Deployment resources are mentioned in the kubectl Cheat Sheet.
Conclusion
Deployments are the recommended way to create pods in Kubernetes as it gives you various advantages like self-healing features, rollback capabilities, monitoring abilities, etc. It also makes your life easier by giving you a declarative YAML file for creating, updating and deleting the pods. You also get useful commands to check the running status, health of your pods, thanks to kubectl.
More references
If this article provided you with value, please support my work — only if you can afford it. You can also connect with me on X. Thank you!


Comments are closed.